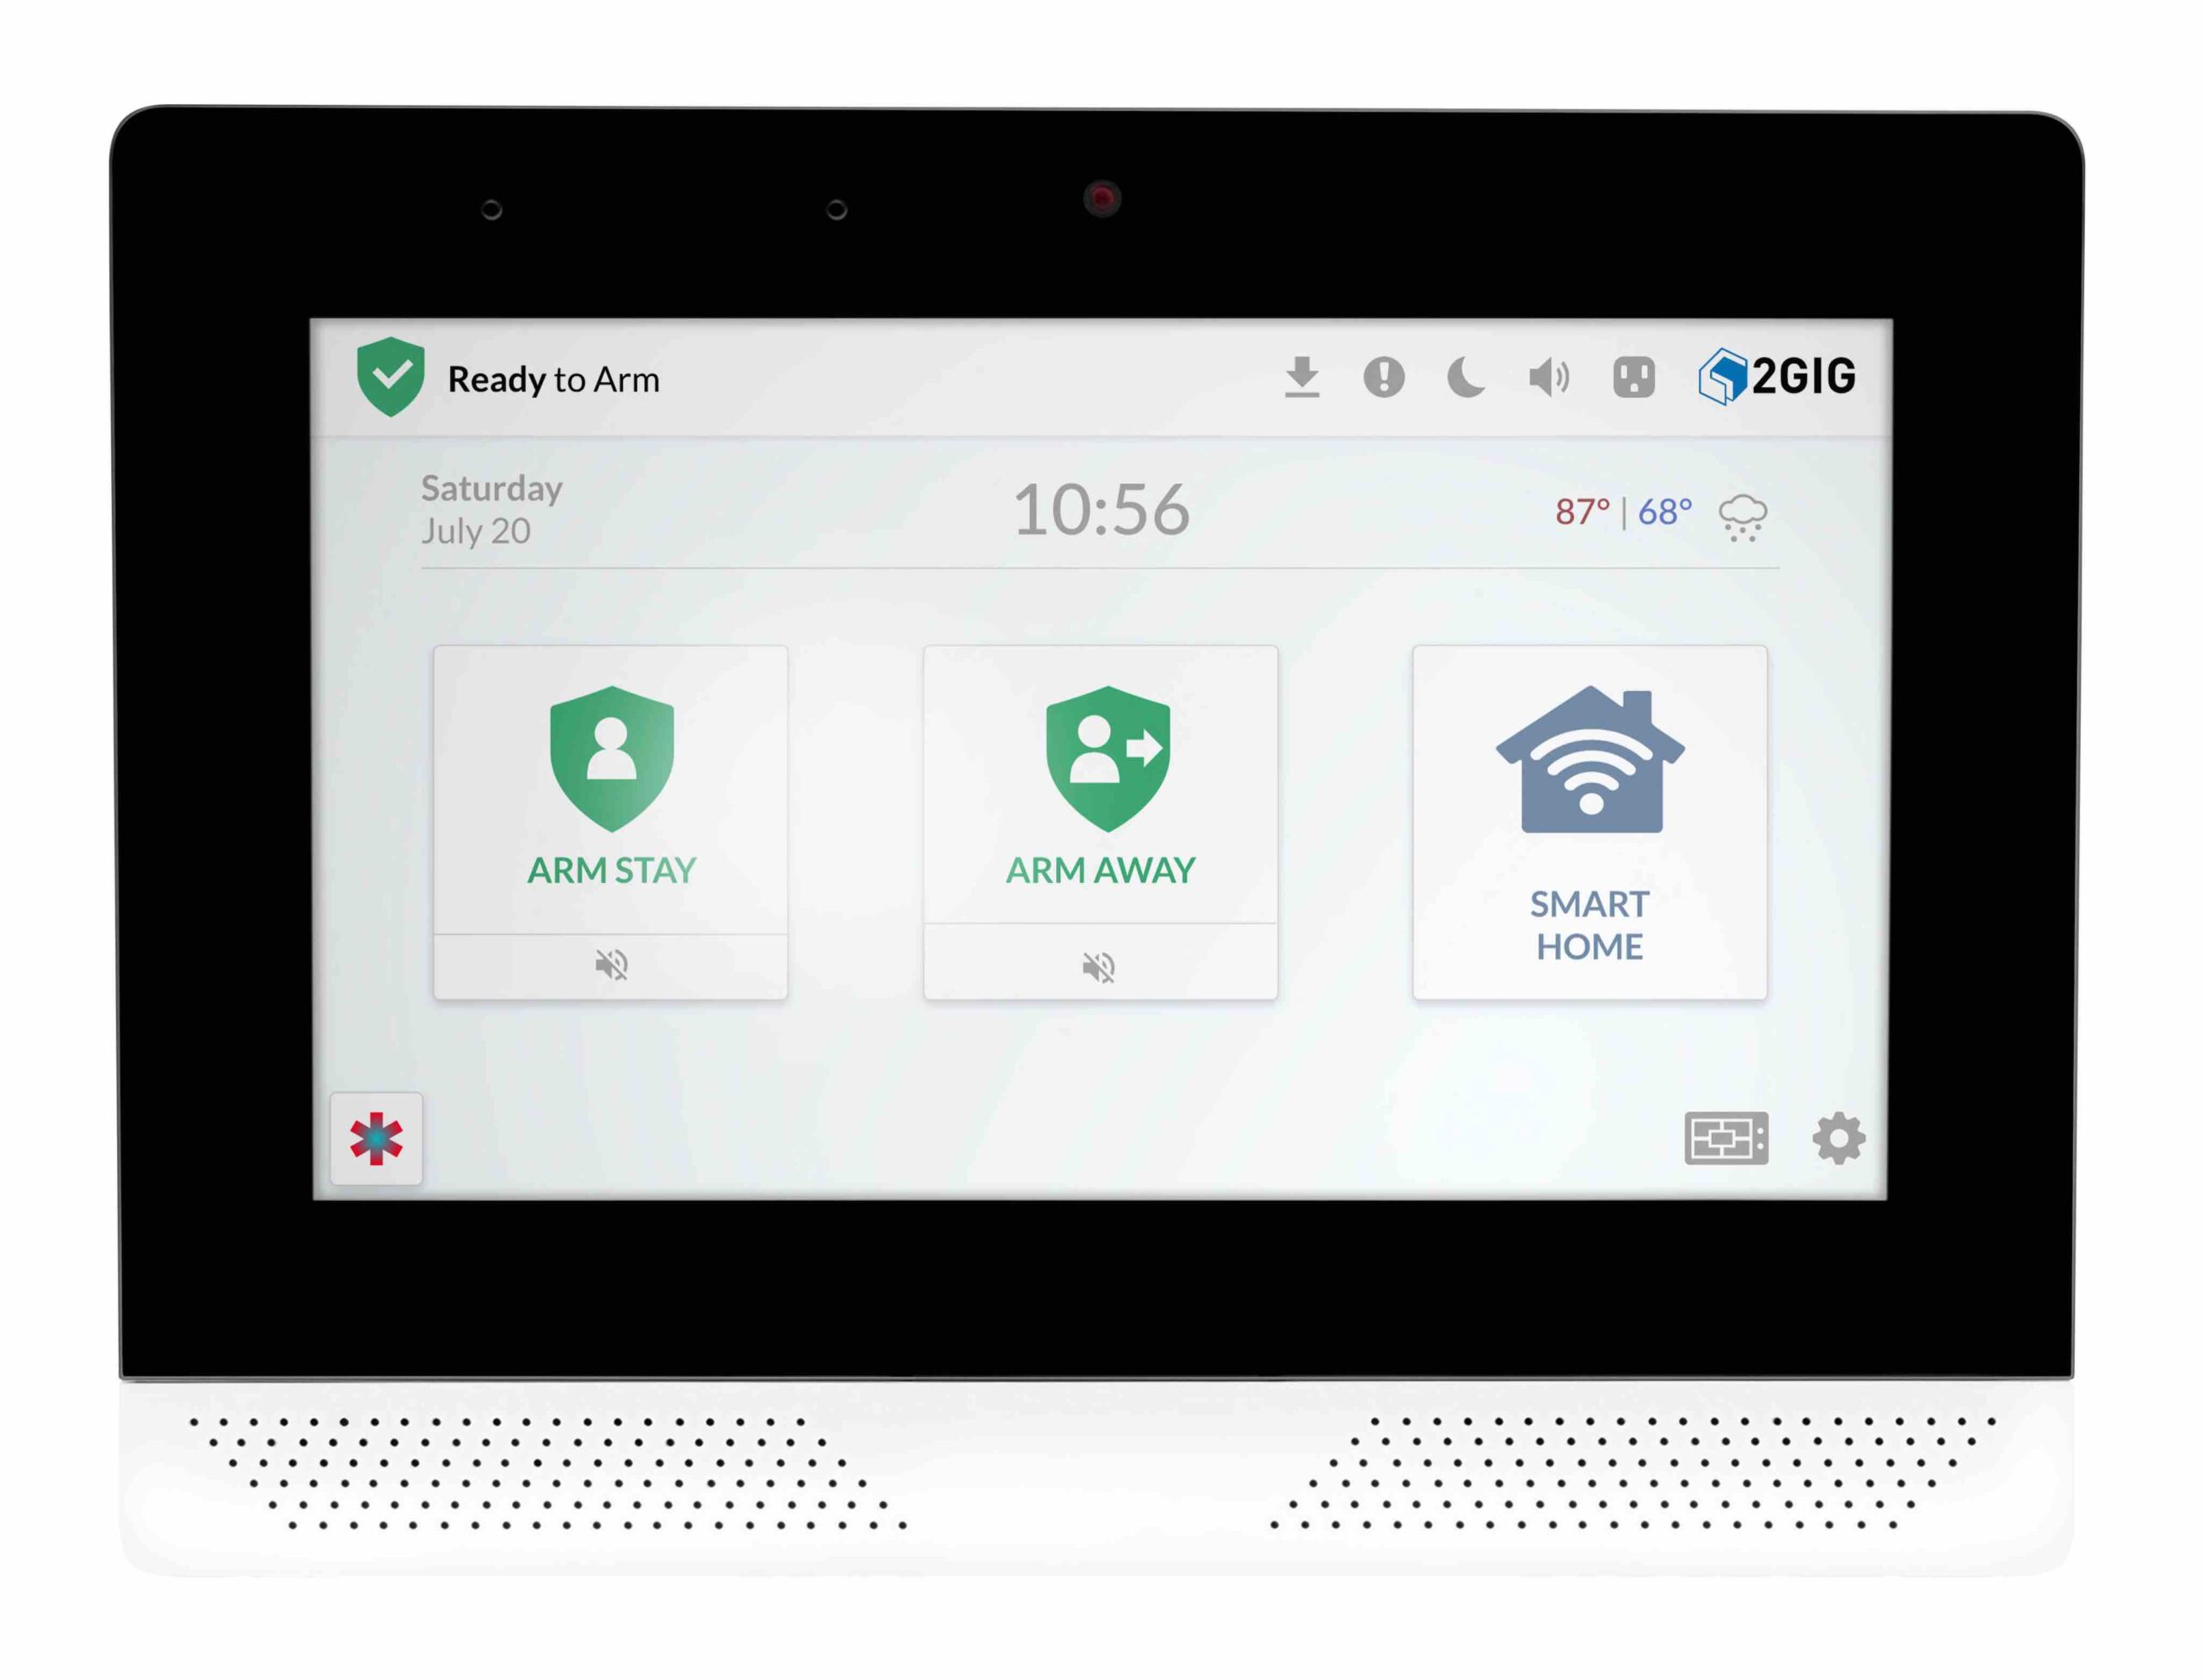
Product Recognition | |
|---|
Certification Number | ZC12-21030195 |
|---|
Name | 2GIG EDGE |
|---|
Short Description | The 2GIG EDGE Panel is the ultimate next generation in security and smart home platform enabling peace of mind, comfort and convenience. Our EDGE processing technology is the difference that enables touchless disarm with facial recognition and analytics within the panel itself – private data stays private for greater peace-of-mind. |
|---|
Long Description | The 2GIG EDGE Panel is the next generation in security and smart home platform enabling peace of mind, comfort and convenience. Our EDGE processing technology is the difference that enables touchless disarm with facial recognition and analytics within the panel itself – private data stays private for greater peace-of-mind. High resolution touchscreen and intuitive user interface is an elegant command center for a home or a small business keeping loved ones protected and safe.
Key Features:
Hands-Free Convenience: Integrated face recognition and Bluetooth technologies significantly streamline operation – no putting down grocery bags to disarm the system.
Increased Data Privacy: Biometrics information is never transmitted to the cloud. Rather than sending images and private biometric data to the Cloud for processing, 2GIG EDGE panel uses on-the-edge analytics to process and authenticate faces privately and fast.
Encrypted Sensors: Help eliminate system hacks and prevent account take-overs. The panel is backwards compatible with older 2GIG sensors.
Smart Home Capabilities: Ability to customize with controls, rules, scenes, notifications and set up Smart Area zone partitioning. Plus, the 2GIG EDGE panel opens the door to future smart home/ automation up-sell opportunities.
Smart Areas, with easy intuitive partitioning, independently arm/disarm up to 4 separate areas of the house.
Built in glass break. Save on hardware costs by using the panel as a glass break sensor.
Live View Video: Cameras and doorbell cameras work with the EDGE panel, with up to 8 different camera feeds viewable directly from the panel. View 4 camera feeds at a time.
Dual Path Communication: Uses both cellular LTE and Wi-Fi to communicate to the network. If one service goes down, the other is always available. Wi-Fi connection also enables faster updates.
Wi-Fi Access Point, the 2GIG Edge panel becomes a router for networked devices. Connect your doorbells cameras, remote keypads and IP cameras to Edge panel.
Z-Wave Plus v2 with S2 Certified. |
|---|
Brand | 2GIG |
|---|
Product Identifier | 2GIG-EDG-NA |
|---|
Product Line | Home Security and Automation |
|---|
OEM Version | HW: 26 FW: 7.13:04.13 |
|---|
Hardware Platform | ZGM130 |
|---|
Z-Wave Version | 7.13.6 |
|---|
Library Type | CONTROLLER_BRIDGE |
|---|
Device Type | Generic Controller DT |
|---|
Role Type | ROLE_TYPE_CONTROLLER_CENTRAL_STATIC |
|---|
Manufacturer ID | 0x0094 |
|---|
Product Type ID | 0x0015 |
|---|
Product ID | 0x0115 |
|---|
User Icon | 0x0500 |
|---|
Installer Icon | 0x0500 |
|---|
Frequency Plans | US: 916.00MHz, 908.40MHz |
|---|
Categories | All Controllers, Gateway Controller |
|---|
Countries / Regions | United States of America |
|---|
Supported Command Classes | Identifier | Name | Key | Version |
|---|
COMMAND_CLASS_NODE_PROVISIONING | Node Provisioning | 0x78 | 1 | COMMAND_CLASS_POWERLEVEL | Powerlevel | 0x73 | 1 | COMMAND_CLASS_INCLUSION_CONTROLLER | Inclusion Controller | 0x74 | 1 | COMMAND_CLASS_MULTI_CHANNEL_ASSOCIATION_V3 | Multi-Channel Association V3 | 0x8E | 3 | COMMAND_CLASS_INDICATOR_V3 | Indicator V3 | 0x87 | 3 | COMMAND_CLASS_APPLICATION_STATUS | Application Status | 0x22 | 1 | COMMAND_CLASS_CRC_16_ENCAP | CRC16 Encapsulation | 0x56 | 1 | COMMAND_CLASS_SECURITY | Security S0 | 0x98 | 1 | COMMAND_CLASS_TIME_V2 | Time V2 | 0x8A | 2 | COMMAND_CLASS_TRANSPORT_SERVICE_V2 | Transport Service V2 | 0x55 | 2 | COMMAND_CLASS_DEVICE_RESET_LOCALLY | Device Reset Locally | 0x5A | 1 | COMMAND_CLASS_ZWAVEPLUS_INFO_V2 | Z-Wave Plus Info V2 | 0x5E | 2 | COMMAND_CLASS_ASSOCIATION_V2 | Association V2 | 0x85 | 2 | COMMAND_CLASS_ASSOCIATION_GRP_INFO | Association Group Info | 0x59 | 1 | COMMAND_CLASS_FIRMWARE_UPDATE_MD_V5 | Firmware Update Meta-Data V5 | 0x7A | 5 | COMMAND_CLASS_NETWORK_MANAGEMENT_INCLUSION_V3 | Network Management Inclusion V3 | 0x34 | 3 | COMMAND_CLASS_SECURITY_2 | Security S2 | 0x9F | 1 | COMMAND_CLASS_MANUFACTURER_SPECIFIC | Manufacturer Specific | 0x72 | 1 | COMMAND_CLASS_VERSION_V3 | Version V3 | 0x86 | 3 | COMMAND_CLASS_SUPERVISION | Supervision | 0x6C | 1 | COMMAND_CLASS_MULTI_CMD | Multi-Command | 0x8F | 1 |
|
|---|
Controlled Command Classes | Identifier | Name | Key | Version |
|---|
COMMAND_CLASS_SWITCH_MULTILEVEL | Switch Multilevel | 0x26 | 1 | COMMAND_CLASS_SWITCH_BINARY_V2 | Switch Binary V2 | 0x25 | 2 | COMMAND_CLASS_DOOR_LOCK | Door Lock | 0x62 | 1 | COMMAND_CLASS_POWERLEVEL | Powerlevel | 0x73 | 1 | COMMAND_CLASS_USER_CODE | User Code | 0x63 | 1 | COMMAND_CLASS_INCLUSION_CONTROLLER | Inclusion Controller | 0x74 | 1 | COMMAND_CLASS_INDICATOR_V3 | Indicator V3 | 0x87 | 3 | COMMAND_CLASS_THERMOSTAT_MODE | Thermostat Mode | 0x40 | 1 | COMMAND_CLASS_SENSOR_MULTILEVEL | Sensor Multilevel | 0x31 | 1 | COMMAND_CLASS_BASIC | Basic | 0x20 | 1 | COMMAND_CLASS_CONFIGURATION | Configuration | 0x70 | 1 | COMMAND_CLASS_CRC_16_ENCAP | CRC16 Encapsulation | 0x56 | 1 | COMMAND_CLASS_SECURITY | Security S0 | 0x98 | 1 | COMMAND_CLASS_NOTIFICATION_V3 | Notification V3 | 0x71 | 3 | COMMAND_CLASS_TRANSPORT_SERVICE_V2 | Transport Service V2 | 0x55 | 2 | COMMAND_CLASS_WAKE_UP_V2 | Wake Up V2 | 0x84 | 2 | COMMAND_CLASS_DEVICE_RESET_LOCALLY | Device Reset Locally | 0x5A | 1 | COMMAND_CLASS_ZWAVEPLUS_INFO_V2 | Z-Wave Plus Info V2 | 0x5E | 2 | COMMAND_CLASS_BARRIER_OPERATOR | Barrier Operator | 0x66 | 1 | COMMAND_CLASS_MULTI_CHANNEL_V4 | Multi-Channel V4 | 0x60 | 4 | COMMAND_CLASS_THERMOSTAT_SETPOINT | Thermostat Setpoint | 0x43 | 1 | COMMAND_CLASS_METER | Meter | 0x32 | 1 | COMMAND_CLASS_MANUFACTURER_SPECIFIC | Manufacturer Specific | 0x72 | 1 | COMMAND_CLASS_VERSION_V3 | Version V3 | 0x86 | 3 | COMMAND_CLASS_SWITCH_COLOR | Switch Color | 0x33 | 1 | COMMAND_CLASS_MULTI_CMD | Multi-Command | 0x8F | 1 |
|
|---|
S2 Classes | S2_UNAUTHENTICATED, S2_AUTHENTICATED, S2_ACCESS_CONTROL |
|---|
Documents | Category | Description | File |
|---|
Manual_English | Supplemental Z-WAVE document (NOT for PUBLIC CONSUMPTION) | | Adv_Manual | 2GIG EDGE Smart Home Manual | | Manual_Primary_Lang | User Manual | | Installer_Guide | 2GIG EDGE Installer Manual | |
|
|---|
Features | Feature | Values |
|---|
Battery Quantity | | Battery Type | | Firmware Updatable | Value |
|---|
Updatable by Professional/Technician |
| Thermostat Modes | | Z-Wave Scene Type | |
|
|---|
Association Groups | Group Number | Maximum Nodes Supported | End Point ID | Group Name | Profile | Description |
|---|
1 | 1 | 0 | Lifeline | 0x0001 | This association group is used to report when panel has been reset |
|
|---|
Texts | ID | Description | Value |
|---|
8 | Where to find S2 DSK on product | This product (2GIG-EDG-NA) does not support secondary controller functionality.
Full DSK string either on the product or in or on the product packaging is not required as per the SiLabs FAE. | 11 | Controller SmartStart Inclusion | To add a device to the Alarm.com device using SmartStart both devices must support SmartStart. To
complete this process, go through the following steps:
Option 1: Alarm.com Partner Portal
1. Log into the Partner Portal at https://alarmadmin.alarm.com/default.aspx and select a customer.
2. Navigate to the “Equipment” page.
3. Click the “Z-Wave Devices” tab.
4. Under the “Manage Devices” header, click “Manage S2 & SmartStart Keys.” Alternatively, you can
go directly to the URL https://alarmadmin.alarm.com/Support/ManageDeviceKeys.aspx
4
5. Click “Add Device Key”
6. You have two options for adding info for the device you want to add:
a. Input the full DSK of the device you want to add, and optionally name it.
b. Click the “USB Barcode Scanner” button, then use a standard USB barcode scanner to
scan the SmartStart QR code of the device. You may also paste in the text from a QR
code.
7. You may optionally add a name for this device as well.
8. Click the “Add Device” button.
9. Power up the new device in range of the Alarm.com device. It will automatically be added to the
Alarm.com device’s network, and will show up on the Z-Wave equipment page at
https://alarmadmin.alarm.com/Support/DeviceAutomation.aspx | 23 | Controller Classic Inclusion | To add a device to the network using no security, S0 security, or S2 unauthenticated security, follow these
steps:
1. Log into the Partner Portal at https://alarmadmin.alarm.com/default.aspx and select a customer.
2. Navigate to the “Equipment” page.
3. Click the “Z-Wave Devices” tab.
4. Under the “Manage Devices” header, click “Add a Z-Wave Device.”
5. Wait for the bolded message “Checking for new devices on the network.” The Alarm.com Z-Wave
device’s DSK is also displayed with the first five digits bolded.
6. Trigger a device to add it to the network.
7. When a device is added successfully, it will show up on this screen following a 30 second delay.
5
8. Continue triggering devices. You may add many devices to the network without reentering Add
Mode.
2.2.2 S2 Authenticated and Access Security
2.2.2.1 Adding Devices Without Client-Side Authentication
Adding a device to the network using the S2 Security Command Class with either authenticated or access
security requires that the device’s DSK (Device Specific Key) is pre-cached in the Alarm.com system. To
pre-cache a key, follow the steps listed in Adding devices to the Alarm.com Z-Wave device’s network
using SmartStart. Then to add the device, follow the steps listed in No Security, S0 Security, and S2
Unauthenticated Security.
2.2.2.2 Adding Devices with Client-Side Authentication
To add a device to the network with Client-Side Authentication (CSA), follow these steps:
1. Add the device as described in No Security, S0 Security, and S2 Unauthenticated Security.
2. When the device requests CSA, a popup will appear on the screen asking if you would like to
continue with CSA. Click “Continue.”
3. Enter the ten large digits displayed on the screen at the device.
4. CSA will finish executing automatically. Click “Save and Exit” once all nodes have been added. | 24 | Controller Classic Exclusion | Removing Communicating Devices
This process leverages Network Wide Exclusion. For SmartStart devices, it is recommended to remove the
node from the Provisioning List before removing it from the network, otherwise it may be added back to
the network using SmartStart. See Access and edit the Alarm.com device’s SmartStart and S2 provisioning
list to remove the node from the Provisioning List. To remove devices from the network, follow these
steps:
1. Log into the Partner Portal at https://alarmadmin.alarm.com/default.aspx and select a customer.
2. Navigate to the “Equipment” page.
3. Click the “Z-Wave Devices” tab.
4. Under the “Manage Devices” header, click “Delete a Z-Wave Device.”
5. Wait for the bolded message “Checking for deleted devices on the network.”
6. Trigger a device to remove it from the network.
7. When a device is deleted successfully and its network information is erased, it will show up on
this screen following a 30 second delay.
8. Continue triggering devices. You may delete many devices to the network without reentering
Delete Mode.
2.3.2 Removing Failed Devices | 3 | Controller Learn Mode | 2.2 Adding devices to the Alarm.com Z-Wave device’s Z-Wave Network
This process leverages Network Wide Inclusion. In addition, any controllers added to the Alarm.com ZWave
device will have network information replicated over to them.
To add a device to the network using no security, S0 security, or S2 unauthenticated security, follow these
steps:
1. Log into the Partner Portal at https://alarmadmin.alarm.com/default.aspx and select a customer.
2. Navigate to the “Equipment” page.
3. Click the “Z-Wave Devices” tab.
4. Under the “Manage Devices” header, click “Add a Z-Wave Device.”
5. Wait for the bolded message “Checking for new devices on the network.” The Alarm.com Z-Wave
device’s DSK is also displayed with the first five digits bolded.
6. Trigger a device to add it to the network.
7. When a device is added successfully, it will show up on this screen following a 30 second delay.
5
8. Continue triggering devices. You may add many devices to the network without reentering Add
Mode. | 10 | Controller Replication | When learning in the Alarm.com Z-Wave device into a primary controller, network information such as
node list and routing information is copied from the primary controller to the Alarm.com Z-Wave device.
This process is also called Controller Replication. This is not required unless there are multiple controllers
in the network. This may be performed after the Alarm.com Z-Wave device has learned into a network to
copy newer network information from the primary controller to the Alarm.com Z-Wave device.
To learn the Alarm.com Z-Wave device into another Z-Wave network, follow these steps:
1. Log into the Partner Portal at https://alarmadmin.alarm.com/default.aspx and select a customer.
2. Navigate to the “Equipment” page.
3. Click the “Z-Wave Devices” tab.
4. If there are any nodes currently in the Alarm.com Z-Wave device’s network, remove them by
following the instructions at Removing devices from the Alarm.com Z-Wave device’s Z-Wave
network.
5. Start add mode on the primary Z-Wave controller.
6. Under the “Manage Devices” header, click “Add Replicate Z-Wave.” The DSK will be displayed
with the first five digits bolded.
7. When the Alarm.com Z-Wave device learns into another network successfully, that network’s
information will show up on the screen. This information may be delayed up to two minutes as
the Alarm.com Z-Wave device queries the nodes. All Z-Wave network information will be copied
from the primary controller to the Alarm.com Z-Wave device | 25 | Controller Provisioning List | Access and edit the Alarm.com device’s SmartStart and S2 provisioning list
Customers can see SmartStart and S2 devices that are primed for inclusion by doing the following steps:
1. Log into the Partner Portal at https://alarmadmin.alarm.com/default.aspx and select a customer.
2. Navigate to the “Equipment” page.
3. Click the “Z-Wave Devices” tab.
4. Under the “Manage Devices” header, click “Manage S2 & SmartStart Keys.” Alternatively, you can
go directly to the URL https://alarmadmin.alarm.com/Support/ManageDeviceKeys.aspx
From that page it’s possible to either “Edit” or “Delete” keys by clicking the relevant links to the right
of devices. | 5 | Factory Reset Procedure | Reset Controller
Available only for Installers, the Reset Controller option
is also found on the Z-Wave settings menu.
Reset the panel’s Z-Wave Controller back to default
settings.
1. Tap Reset Controller. | 9 | Capability Rediscovery | A node capability rediscovery is a procedure to query all nodes in the network for their command classes,
command class versions, and capabilities. To perform a node capability rediscovery, follow these steps:
1. Log into the Partner Portal at https://alarmadmin.alarm.com/default.aspx and select a customer.
2. Navigate to the “Equipment” page.
3. Click the “Z-Wave Devices” tab.
4. Under the “Advanced Z-Wave Commands” header, click “Rebuild Equipment List”
5. Check off “All Values,” then click “Request Equipment List” |
|
|---|
Supported / Controlled Meter Types | Meter Type | Rate Type | Description |
|---|
Electric meter | Import | Electric Meter Consumption |
|
|---|
Supports NWI | Yes |
|---|
Supports Explorer Frames | Yes |
|---|
Supports SmartStart | Yes |
|---|
Radio Range Z-Wave (m) | 40 |
|---|

-lowres.jpg)
-lowres-scaled.jpg)