Product Recognition | |
|---|
Certification Number | ZC10-15040003 |
|---|
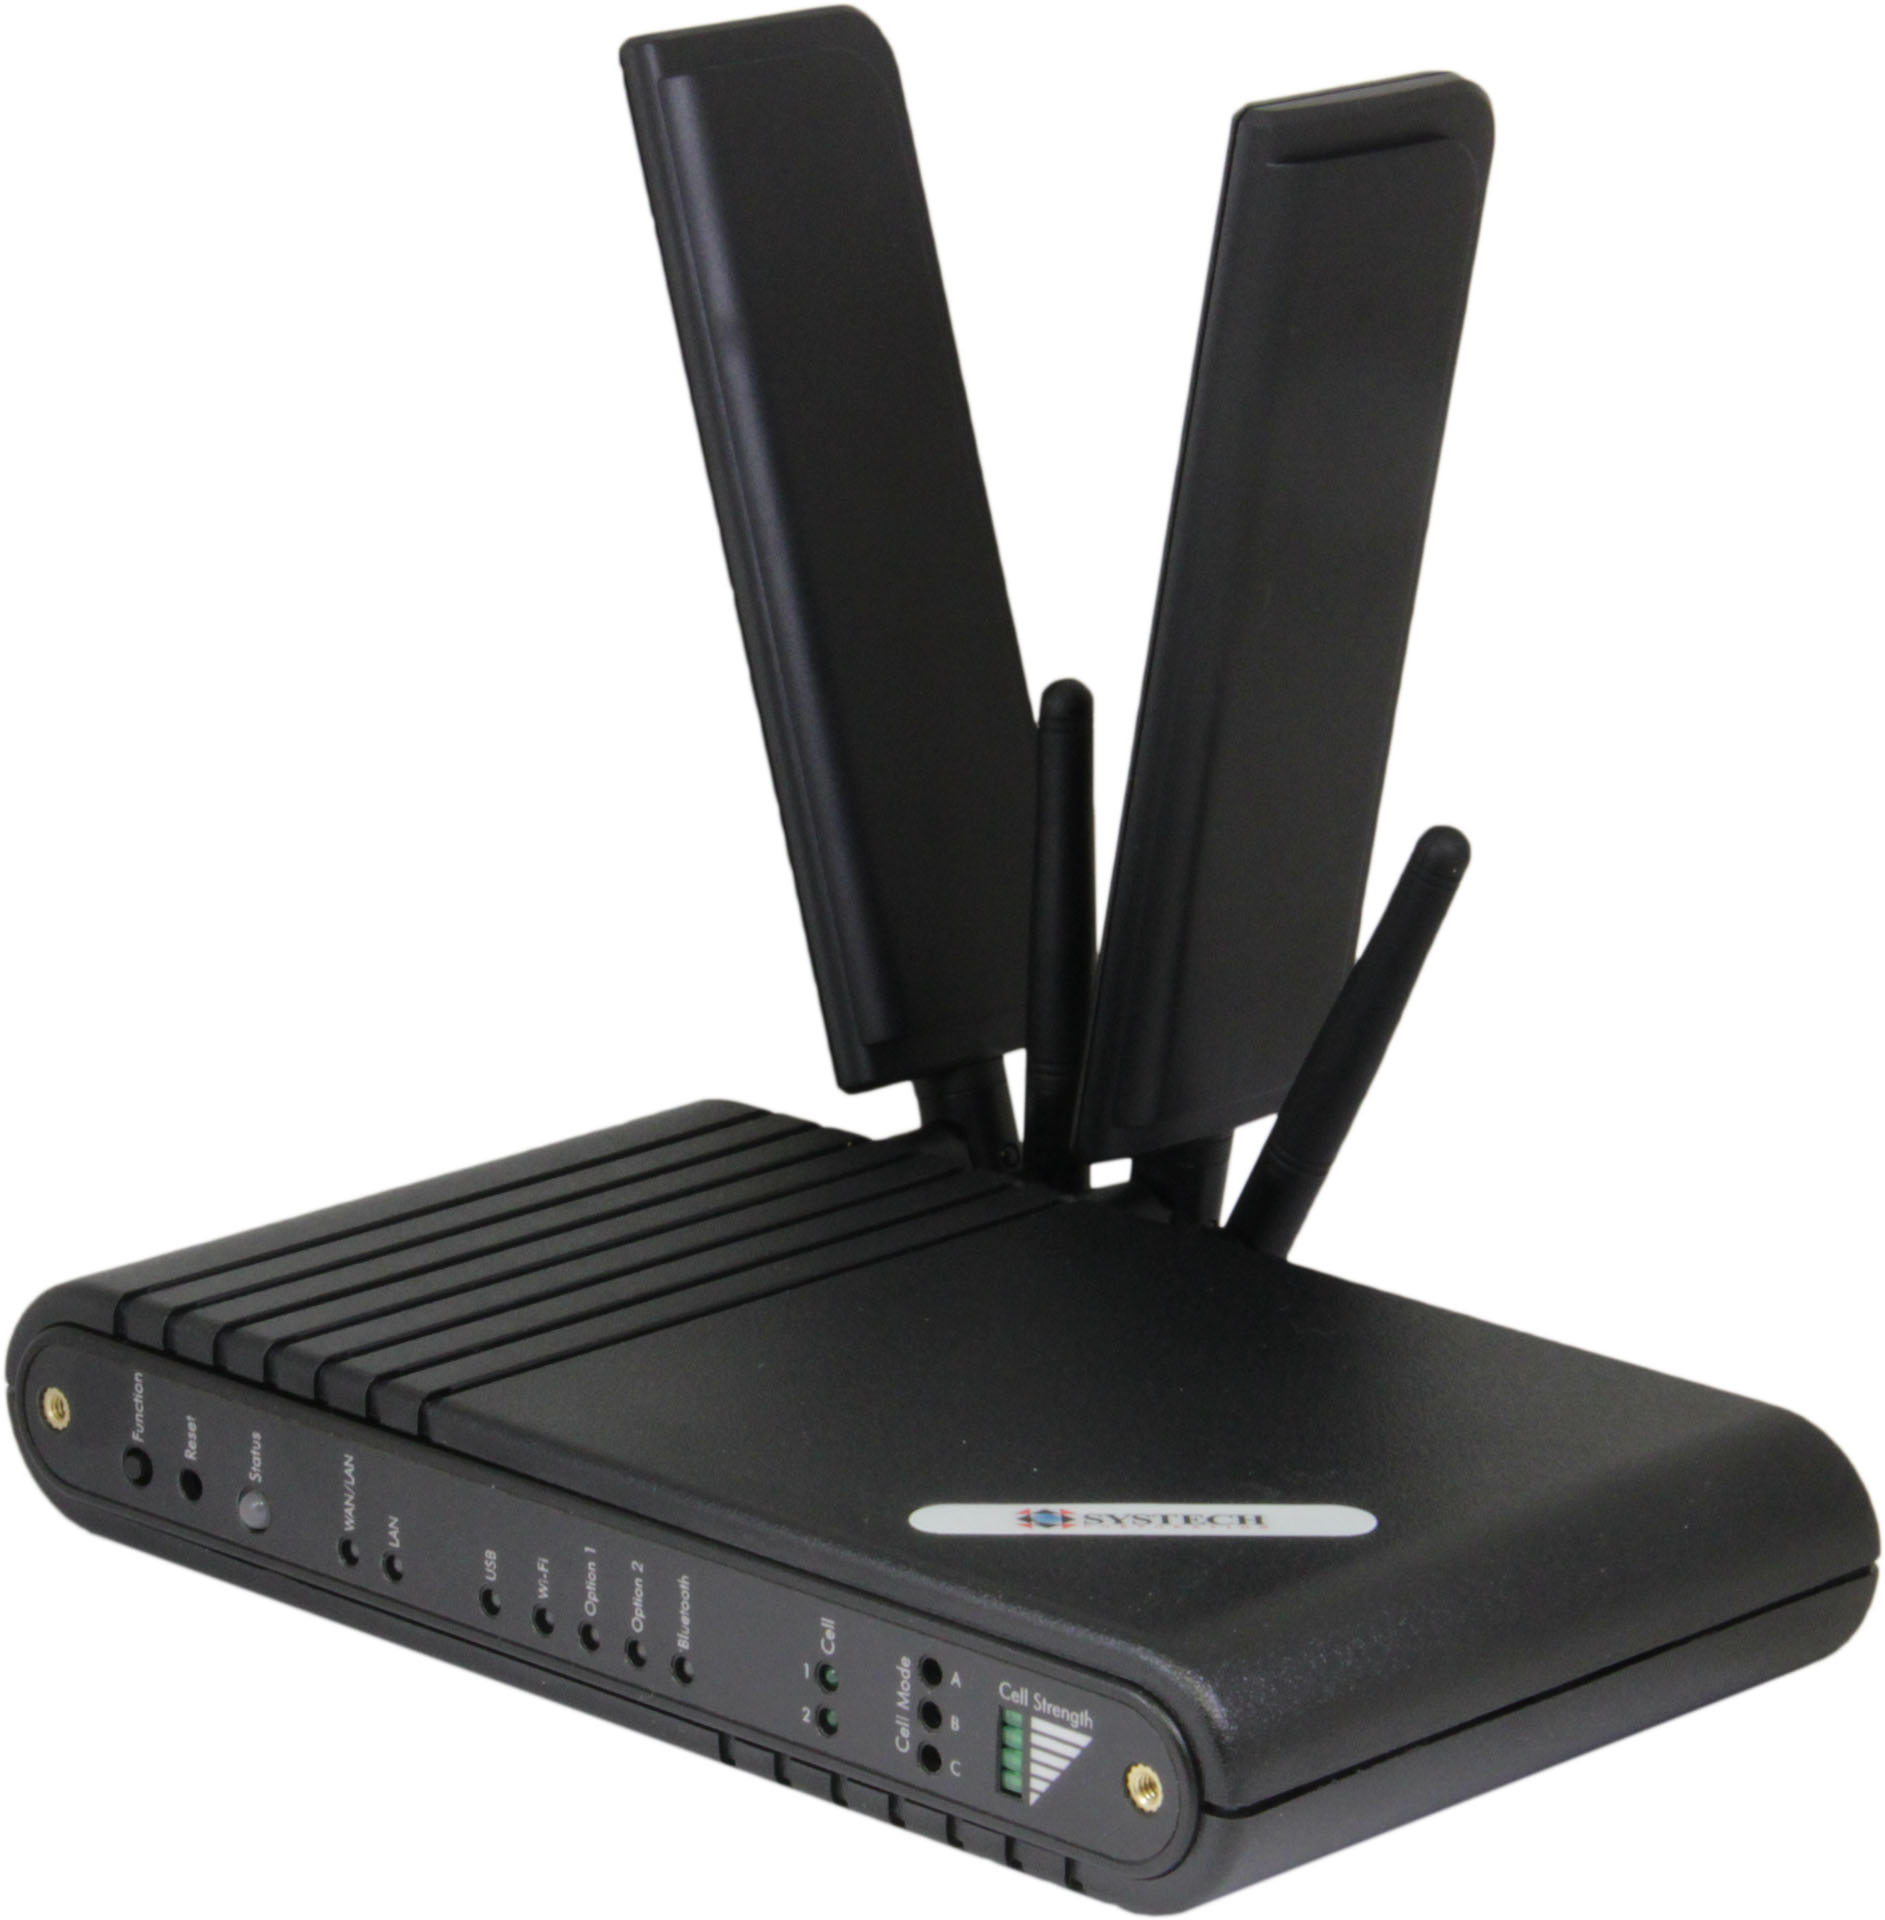
Name | SysLINK M2M Gateway |
|---|
Short Description | The Systech® SysLINK® IoT / M2M Modular Gateway enables remote access to a wide variety of sensors and devices for monitoring and control purposes. |
|---|
Long Description | The Systech® SysLINK® IoT / M2M Gateway enables remote access to a wide variety of sensors and devices for monitoring and control purposes.
The SysLINK M2M Gateway is a full-function router, including DHCP and NAT. Optional Advanced Routing includes firewall capabilities. With enterprise quality remote management, network configurations can be changed or updated remotely. The VPN option supports client and server modes using IPSec or OpenVPN.
Support for a wide range of M2M and IoT applications is achieved with module option cards that may be populated to extend the features and functionality of the gateway. Option cards may also be installed on location.
The network failover feature provides a connection hierarchy for transitioning from one network to another based on current network health status. The priority sequence may be uniquely defined for any application, and includes cellular, Ethernet, Wi-Fi, and Analog/Dial POTS ports.
Most models support two cellular modules in the same gateway (and dual SIM). The gateway continuously analyzes connection quality and will automatically switch to an alternative cellular network when required. The network failover and dual cellular features decrease downtime and provides more reliable network connectivity.
The SysLINK gateway includes an embedded Linux operating system and processor enabling execution of local software. Your own custom software may be integrated to provide application-specific, value-added features to provide a truly unique solution. Systech provides the tools for a unified development environment supporting Java, C, C++, Python, Lua, and other programming and scripting languages. |
|---|
Brand | Systech Corporation |
|---|
Product Identifier | SL-1500 |
|---|
OEM Version | 1 |
|---|
Hardware Platform | ZM5202 |
|---|
Z-Wave Version | 6.51.00 |
|---|
Library Type | CONTROLLER_STATIC |
|---|
Device Type | Central Controller |
|---|
Role Type | ROLE_TYPE_CONTROLLER_CENTRAL_STATIC |
|---|
Manufacturer ID | 0x0136 |
|---|
Product Type ID | 0x0001 |
|---|
Product ID | 0x0001 |
|---|
Frequency Plans | US: 916.00MHz, 908.40MHz |
|---|
Categories | All Controllers, Gateway Controller |
|---|
Countries / Regions | United States of America |
|---|
Controlled Command Classes | Identifier | Name | Key | Version |
|---|
COMMAND_CLASS_SENSOR_BINARY | Sensor Binary | 0x30 | 1 | COMMAND_CLASS_ASSOCIATION | Association | 0x85 | 1 | COMMAND_CLASS_SWITCH_MULTILEVEL | Switch Multilevel | 0x26 | 1 | COMMAND_CLASS_ASSOCIATION_GROUP_INFORMATION | Association Group Information V1 | 0x59 | 0 | COMMAND_CLASS_DOOR_LOCK | Door Lock | 0x62 | 1 | COMMAND_CLASS_NO_OPERATION | No Operation | 0x00 | 1 | COMMAND_CLASS_THERMOSTAT_FAN_MODE | Thermostat Fan Mode | 0x44 | 1 | COMMAND_CLASS_MULTI_CHANNEL | Multi-Channel V1 | 0x60 | 0 | COMMAND_CLASS_ALARM | Alarm | 0x71 | 1 | COMMAND_CLASS_BATTERY | Battery | 0x80 | 1 | COMMAND_CLASS_WAKE_UP | Wake Up | 0x84 | 1 | COMMAND_CLASS_THERMOSTAT_OPERATING_STATE | Thermostat Operating State | 0x42 | 1 | COMMAND_CLASS_THERMOSTAT_MODE | Thermostat Mode | 0x40 | 1 | COMMAND_CLASS_THERMOSTAT_FAN_STATE | Thermostat Fan State | 0x45 | 1 | COMMAND_CLASS_SENSOR_MULTILEVEL | Sensor Multilevel | 0x31 | 1 | COMMAND_CLASS_SWITCH_BINARY | Switch Binary | 0x25 | 1 | COMMAND_CLASS_BASIC | Basic | 0x20 | 1 | COMMAND_CLASS_CONFIGURATION | Configuration | 0x70 | 1 | COMMAND_CLASS_CRC_16_ENCAP | CRC16 Encapsulation | 0x56 | 1 | COMMAND_CLASS_SECURITY | Security S0 | 0x98 | 1 | COMMAND_CLASS_DEVICE_RESET_LOCALLY | Device Reset Locally | 0x5A | 1 | COMMAND_CLASS_THERMOSTAT_SETPOINT | Thermostat Setpoint | 0x43 | 1 | COMMAND_CLASS_METER | Meter | 0x32 | 1 | COMMAND_CLASS_MANUFACTURER_SPECIFIC | Manufacturer Specific | 0x72 | 1 |
|
|---|
Documents | Category | Description | File |
|---|
Manual_Primary_Lang | Product or Owner's Manual | |
|
|---|
Association Groups | Group Number | Maximum Nodes Supported | End Point ID | Description |
|---|
1 | 5 | 0 | Z-Wave Plus Lifeline |
|
|---|
Texts | ID | Description | Value |
|---|
3 | Learn Mode (adding another controller) | 1. From the gateway page, click Settings,
2. Click Manage Z-Wave Settings.
3. Enter Add Mode on the primary or inclusion controller (not the SysLINK gateway).
4. Click Enter Learn Mode on SysLINK. The gateway should add itself to the controller’s Z-Wave network. | 5 | Factory Reset | 1. Click the customize button on the upper right-hand corner of the mashup.
2. Click Select App.
3. Select the proper application.
4. As list of gateways appear on the Gateways mashup, click the Manage Gateways button.
5. In the lower left-hand corner, press the Factory Reset button.
6. Confirm the factory reset. | 23 | Controller Inclusion | 1. To add a device to the Z-Wave network, the following steps must be taken. From the gateway page, click Settings,
2. Click Manage Z-Wave Settings.
3. Click Add Device. Now that the gateway is looking for a device, the device must allow itself to be found. This process depends on the device. Some have a button, perhaps labeled “Add” or “Include” that you must press. Others enter the Add mode simply by inserting a battery or removing a plastic strip separating the battery from a contact. Consult the manufacturer’s documentation packaged with the device for details; instructions for many devices can be found on manufacturers’ websites.
4. After the device is connected, a configuration page appears. On this page you can assign a name to the device, assign the device to groups and specify whether to record device sensor history. | 24 | Controller Exclusion | 1. From the gateway page, click Settings,
2. Click Manage Z-Wave Settings.
3. Click Remove Device. Now that the gateway is looking for a device to remove, the device must allow itself to be found. This process depends on the device. Putting the device into remove mode may require pressing a button or removing a battery. Consult the manufacturer’s documentation packaged with the device for details; instructions for many devices can be found on manufacturers’ websites. When a device to remove is found, it appears in a list of deleted devices. |
|
|---|
Supports NWI | Yes |
|---|
Supports Explorer Frames | Yes |
|---|
Radio Range Z-Wave (m) | 40 |
|---|
.jpg)